1、OKio框架
2、OKio的设计思想
(1)Sink / Source
(2)Buffer机制–Segment和SegmentPool
(3)超时机制–Timeout和AsyncTimeout
3、参考文档
1、OKio框架
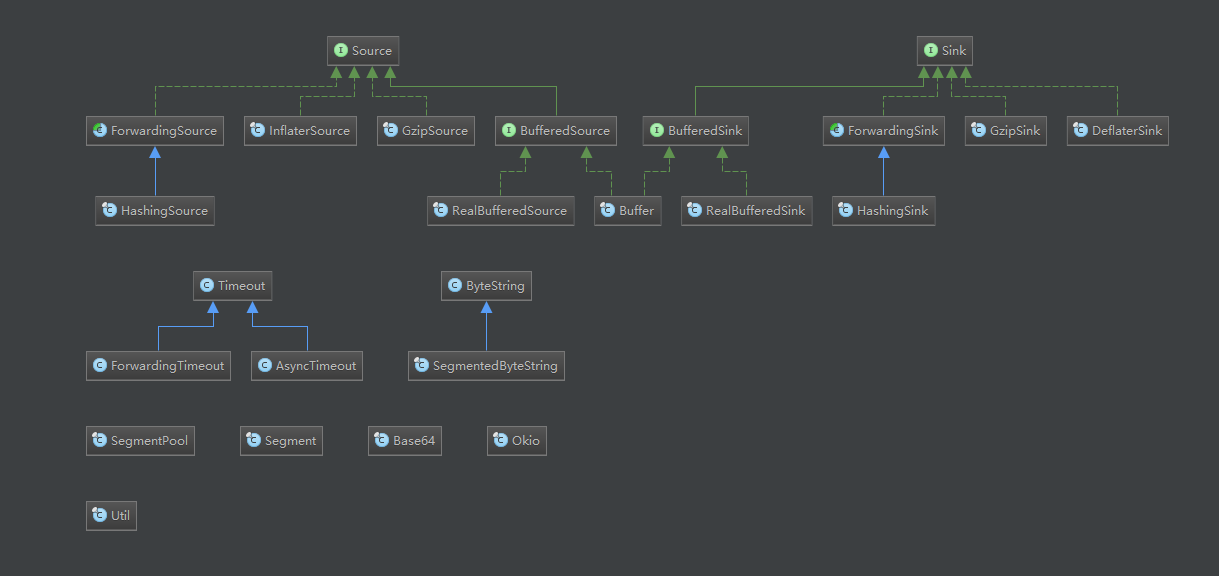

上面两张图是OKio和Java IO的类图。我们可以很直观的看出两者之间的异同。
相同点:
本质一样,都是对流的操作,Source类似于InputStream/Reader,Sink类似于OutputStream/Writer,Source/Sink到最后操作的还是InputStream/OutputStream。
除了基本的read/write外,还有支持特定需求的各种子类。
OKio的优势
(1)N合一。OKio精简了输入输出流的类个数
(2)低的CPU和内存消耗。OKio的Buffer机制更加优秀,引入Segment和SegmentPool复用机制
(3)OKio支持Timeout超时机制
(4)使用方便。ByteString处理不变byte,Buffer处理可变byte。
(5)提供了一系列的工具。OKio支持md5、sha、base64等数据处理
这部分总结,参考链接(1)的大佬总结的很好,膜拜。
2、OKio的设计思想
下面重点讲下OKio框架设计中关键的几个部分。
(1)Source / Sink
Source的意思是水源,Sink的意思是水槽,非常形象的表明了流的输入输出。
其中Source对应输入流,Sink对应输出流。
以Source为例,其代码如下:
public interface Source extends Closeable {
  /**
   * Removes at least 1, and up to {@code byteCount} bytes from this and appends
   * them to {@code sink}. Returns the number of bytes read, or -1 if this
   * source is exhausted.
   */
  long read(Buffer sink, long byteCount) throws IOException;

  /** Returns the timeout for this source. */
  Timeout timeout();

  /**
   * Closes this source and releases the resources held by this source. It is an
   * error to read a closed source. It is safe to close a source more than once.
   */
  @Override void close() throws IOException;
}
继承关系如图:
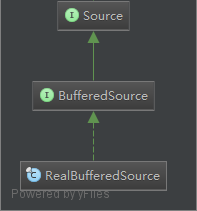
Source和BufferedSource都是接口,BufferedSource在Source基础上扩充了一些方法,实现类是RealBufferedSource,真正的read操作还是通过Buffer来执行,Buffer类似于BufferedInputStream/BufferedReader,只不过传统的Java IO里缓存区是byte[]/char[]缓冲数组,而Buffer里面是一个链表的数据结构。
Sink结构和Source类似。
(2)Buffer机制–Segment和SegmentPool

上图是Buffer机制的框架图。
Segment是一个双向循环链表,每个结点容量为8K字节,头结点为head。
SegmentPool维护一个Segment单向链表,容量为8*Segment,回收不用的Segment对象。
当从InputStream中读数据时,读取的数据会写进Segment双向循环链表tail。如果Segment双向链表内存不够,会从SegmentPool中take()一个Segment添加到双向循环链表尾部。
当往OutputStrem中写数据时,从Segment双向循环链表head开始读取数据到OutputStream,读完的Segment结点从双向循环链表移除,并回收到SegmentPool中,等待下次复用。
看完整个Buffer的代码会发现,Buffer的结构非常类似于Netty里的ByteBuf。
可以简单看下ByteBuf的结构图:

更详细的内容可以参考下面给出的参考链接。
下面是Segment类的定义:
final class Segment {
  //一个Segment中data字节数组的最大容量8K,单位:字节
  static final int SIZE = 8192;
  //当Segment中字节数 > SHARE_MINIMUM时(大Segment),只能共享,不能添加到SegmentPool
  static final int SHARE_MINIMUM = 1024;
  //字节数组
  final byte[] data;
  //下一次读取的开始位置
  int pos;
  //写入的开始位置
  int limit;
  //data是否可以直接供其他Segment或byte string复用,不需要又去重新拷贝一份data,节省内存
  boolean shared;
  //data是否仅当前Segment独有,不share
  boolean owner;
  //后继结点
  Segment next;
  //前驱结点
  Segment prev;

  //添加一个Segment到当前Segment的后面
  public Segment push(Segment segment) {...}

  //移除当前Segment
  public @Nullable Segment pop() {...}

  //当前Segment分裂成2个Segment结点。前面结点pos~limit数据范围是[pos..pos+byteCount),
  后面结点pos~limit数据范围是[pos+byteCount..limit)
  public Segment split(int byteCount) {...}

  //当前Segment结点和prev前驱结点合并成一个Segment,统一合并到prev,然后当前Segment结点从双向循环链表移除并添加到SegmentPool复用。当然合并的前提是:2个Segment的字节总和不超过8K。合并后可能会移动pos、limit
  public void compact() {...}
}
下面是SegmentPool类的代码:
final class SegmentPool {
  //最大字节数,相当于8个Segment的容量,64 KiB.
  static final long MAX_SIZE = 64 * 1024;
  //单链表,next是下次take()返回的结点
  static @Nullable Segment next;
  //字节总数
  static long byteCount;

  //返回一个Segment,返回的是next
  static Segment take() {...}

  //添加一个Segment,添加到next前面
  static void recycle(Segment segment) {...}
}
Buffer重点关注2个方法read/write。
基本思路就是:对于InputStream,数据从InputStream读到Buffer里的Segment双向循环链表,必要的时候需要从SegmentPool中取Segment补充到双向循环链表;对于OutputStream,数据从Buffer里的Segment双向循环链表写到OutputStream,并将写完的Segment扔到SegmentPool中。
下面是代码:
/** Write {@code byteCount} bytes from this to {@code out}. */
public Buffer writeTo(OutputStream out, long byteCount) throws IOException {
    if (out == null) throw new IllegalArgumentException("out == null");
    checkOffsetAndCount(size, 0, byteCount);

    Segment s = head;
    while (byteCount > 0) {
      int toCopy = (int) Math.min(byteCount, s.limit - s.pos);
      out.write(s.data, s.pos, toCopy);

      s.pos += toCopy;
      size -= toCopy;
      byteCount -= toCopy;

      if (s.pos == s.limit) {
        Segment toRecycle = s;
        head = s = toRecycle.pop();
        SegmentPool.recycle(toRecycle);
      }
    }

    return this;
}


  private void readFrom(InputStream in, long byteCount, boolean forever) throws IOException {
    if (in == null) throw new IllegalArgumentException("in == null");
    while (byteCount > 0 || forever) {
      Segment tail = writableSegment(1);
      int maxToCopy = (int) Math.min(byteCount, Segment.SIZE - tail.limit);
      int bytesRead = in.read(tail.data, tail.limit, maxToCopy);
      if (bytesRead == -1) {
        if (forever) return;
        throw new EOFException();
      }
      tail.limit += bytesRead;
      size += bytesRead;
      byteCount -= bytesRead;
    }
  }
(3)超时机制–Timeout和AsyncTimeout
在传统的Java IO类库中是没有超时检测的,如果我们要实现这样一个机制,是需要再封装一层的。
OKio框架中提供了Timeout和AsyncTimeout两个类,用于实现超时机制。Timeout是同步,AsyncTimeout是异步。在OKHttp框架里面,Socket流使用的是AsyncTimeout,其他流使用的是Timeout。
重点分析AsyncTimeout,先看这个类的基本结构:
public class AsyncTimeout extends Timeout {
  //单链表,static全局变量
  static AsyncTimeout head;
  //当前结点是否在单链表中
  private boolean inQueue;
  //单链表后继结点
  private @Nullable AsyncTimeout next;

  //流操作开始时调用
  public final void enter(){...}
  //流操作结束时调用
  public final boolean exit() {...}
  //流操作超时时调用
  protected void timedOut() {...}

  //监听单链表中结点对应的流是否超时的WatchDog线程
  private static final class Watchdog extends Thread {
    Watchdog() {
      super("Okio Watchdog");
      setDaemon(true);
    }

    public void run() {
      while (true) {
        try {
          AsyncTimeout timedOut;
          synchronized (AsyncTimeout.class) {
            timedOut = awaitTimeout();

            // Didn't find a node to interrupt. Try again.
            if (timedOut == null) continue;

            // The queue is completely empty. Let this thread exit and let another watchdog thread
            // get created on the next call to scheduleTimeout().
            if (timedOut == head) {
              head = null;
              return;
            }
          }

          //超时回调
          timedOut.timedOut();
        } catch (InterruptedException ignored) {
        }
      }
    }
  }
}
总结下AsyncTimeout的特点:
(1)AsyncTimeout是一个单链表,结点按等待时间从小到大排序,head是一个头结点,起占位作用。
(2)提供了3个方法enter(), exit(), timeout(),分别用于流操作开始、结束、超时三种情况调用
(3)有一个WatchDog的守护线程,在while(true)死循环里不停检测单链表里第一个结点对应的流是否超时,若超时进行回调
再去细看源码的话,我们会知道:
(1)enter()将当前流对应的AsyncTimeout结点根据等待时机顺序插入到单链表中
(2)exit()将当前流对应的AsyncTimeout结点从单链表中移除
根据下面使用AsyncTimeout的地方,我们知道,一个AsyncTimeout结点专门检测一个Socket流是否超时,在这个流的read/write操作的开始调用enter(),结束调用exit()。在OKhttp里面,timeout()回调方法中会关闭流。
关于设计成单链表的个人思考:
(1)看Handler源码的时候,我们会发现MessageQueue就是一个按发送时间排序的Message单链表,和AsyncTimeout设计思想有异曲同工之妙。
(2)在我们之前看过的很多代码里,比如有一系列对象,需要监听每个对象的状态,我们一般会考虑使用HashMap<Subject, Listener>来实现,和这里使用单链表的思路和以前是不同的。
(3)再延伸一下,如果遇到涉及列表对象,且有时间先后顺序的场景,可以考虑下使用单链表的数据结构
附上AsyncTime调用的地方:
  #<Okio.java>
  public static Source source(Socket socket) throws IOException {
    if (socket == null) throw new IllegalArgumentException("socket == null");
    if (socket.getInputStream() == null) throw new IOException("socket's input stream == null");
    AsyncTimeout timeout = timeout(socket);
    Source source = source(socket.getInputStream(), timeout);
    return timeout.source(source);
  }

  #<AsyncTimeout.java>
  public final Source source(final Source source) {
    return new Source() {
      @Override public long read(Buffer sink, long byteCount) throws IOException {
        boolean throwOnTimeout = false;
        enter();
        try {
          long result = source.read(sink, byteCount);
          throwOnTimeout = true;
          return result;
        } catch (IOException e) {
          throw exit(e);
        } finally {
          exit(throwOnTimeout);
        }
      }

      @Override public void close() throws IOException {
        boolean throwOnTimeout = false;
        try {
          source.close();
          throwOnTimeout = true;
        } catch (IOException e) {
          throw exit(e);
        } finally {
          exit(throwOnTimeout);
        }
      }

      @Override public Timeout timeout() {
        return AsyncTimeout.this;
      }

      @Override public String toString() {
        return "AsyncTimeout.source(" + source + ")";
      }
    };
  }
OKio并不是那么好理解,可以多看看别人写的总结,下面列出了部分链接。
3、参考文档
(1)深入理解okio的优化思想
(2)Okio精简高效的IO库
(3)大概是最完全的Okio源码解析文章
(4)Netty4学习笔记(4)– ByteBuf和设计模式